


Introduction
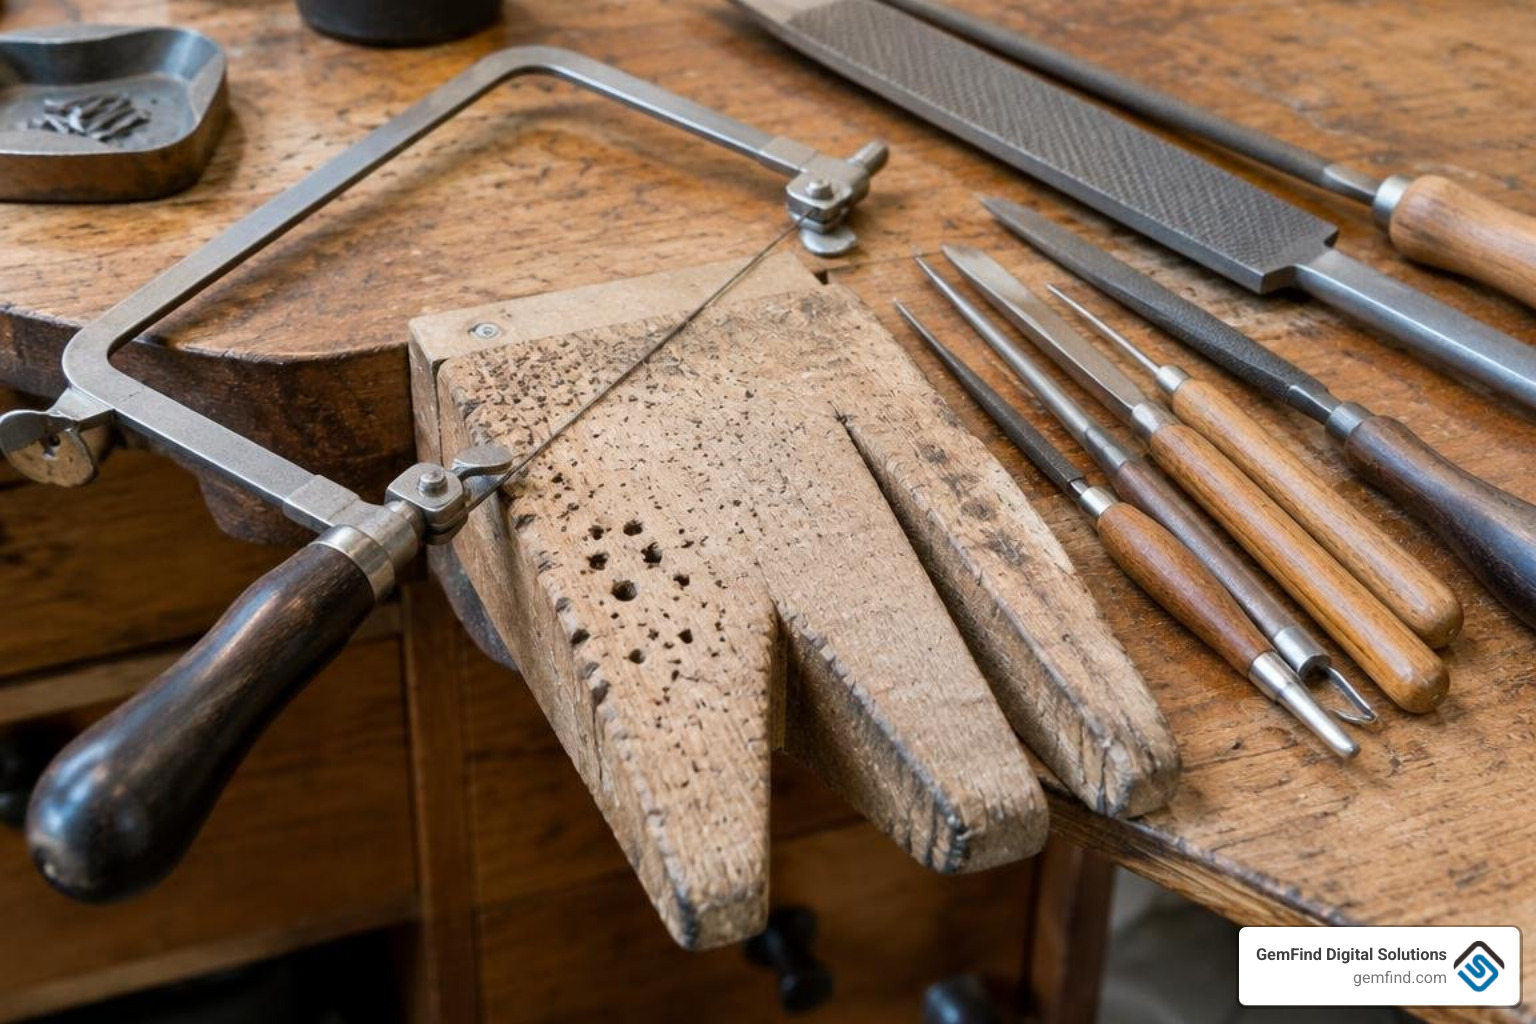
Custom wax carving jewellery is the hands-on process of shaping specialized carving wax into a detailed prototype ready for lost-wax casting. The core workflow begins by sizing a wax tube blank, roughing out the silhouette with a spiral saw, blocking out profile dimensions with coarse wax files, refining structural details and wall thickness using fine needle files, and smoothing the surface with scrapers and wet sandpaper before attaching a sprue for metal casting. This subtractive and additive technique allows you to sculpt organic contours, crisp geometric facets, and tactile textures that are difficult to replicate in digital CAD.
Wax carving is an ancient tradition in jewellery making going back 6,000 years. Long before modern computer-aided design (CAD) software and high-precision 3D resin printers entered the bench scene, artisans hand-sculpted intricate talismans, royal seals, and ceremonial adornments out of natural waxes. Today, even as digital manufacturing flourishes, the tactile allure of hand-carved wax remains unmatched.
When you carve by hand, you bypass the cold geometric constraints of digital wireframes. You can produce fluid, organic forms, earthy textures, and expressive, sculptural contours that reflect the artist's touch.
In this comprehensive guide, we walk you through the essential mechanics of lost-wax casting, explore the spectrum of carving waxes, detail the exact bench tools you need, and guide you through transforming your soft wax prototype into a hallmarked precious metal heirloom.
The Foundations of Lost-Wax Casting and Jeweler's Wax
At its core, custom wax carving for jewellery relies on the lost-wax casting method, historically known as cire perdue. This subtractive and additive sculpting technique lets you build complex, three-dimensional designs in an affordable, forgiving medium before committing to valuable precious metals like sterling silver, rich yellow gold, or dense platinum.
Wax allows you to make mistakes, fill voids, carve intricate undercuts, and evaluate physical proportions in real space. Reviewing traditional carving fundamentals provides valuable insight into how master jewellers have manipulated this versatile material across centuries.
What Is Lost-Wax Casting?
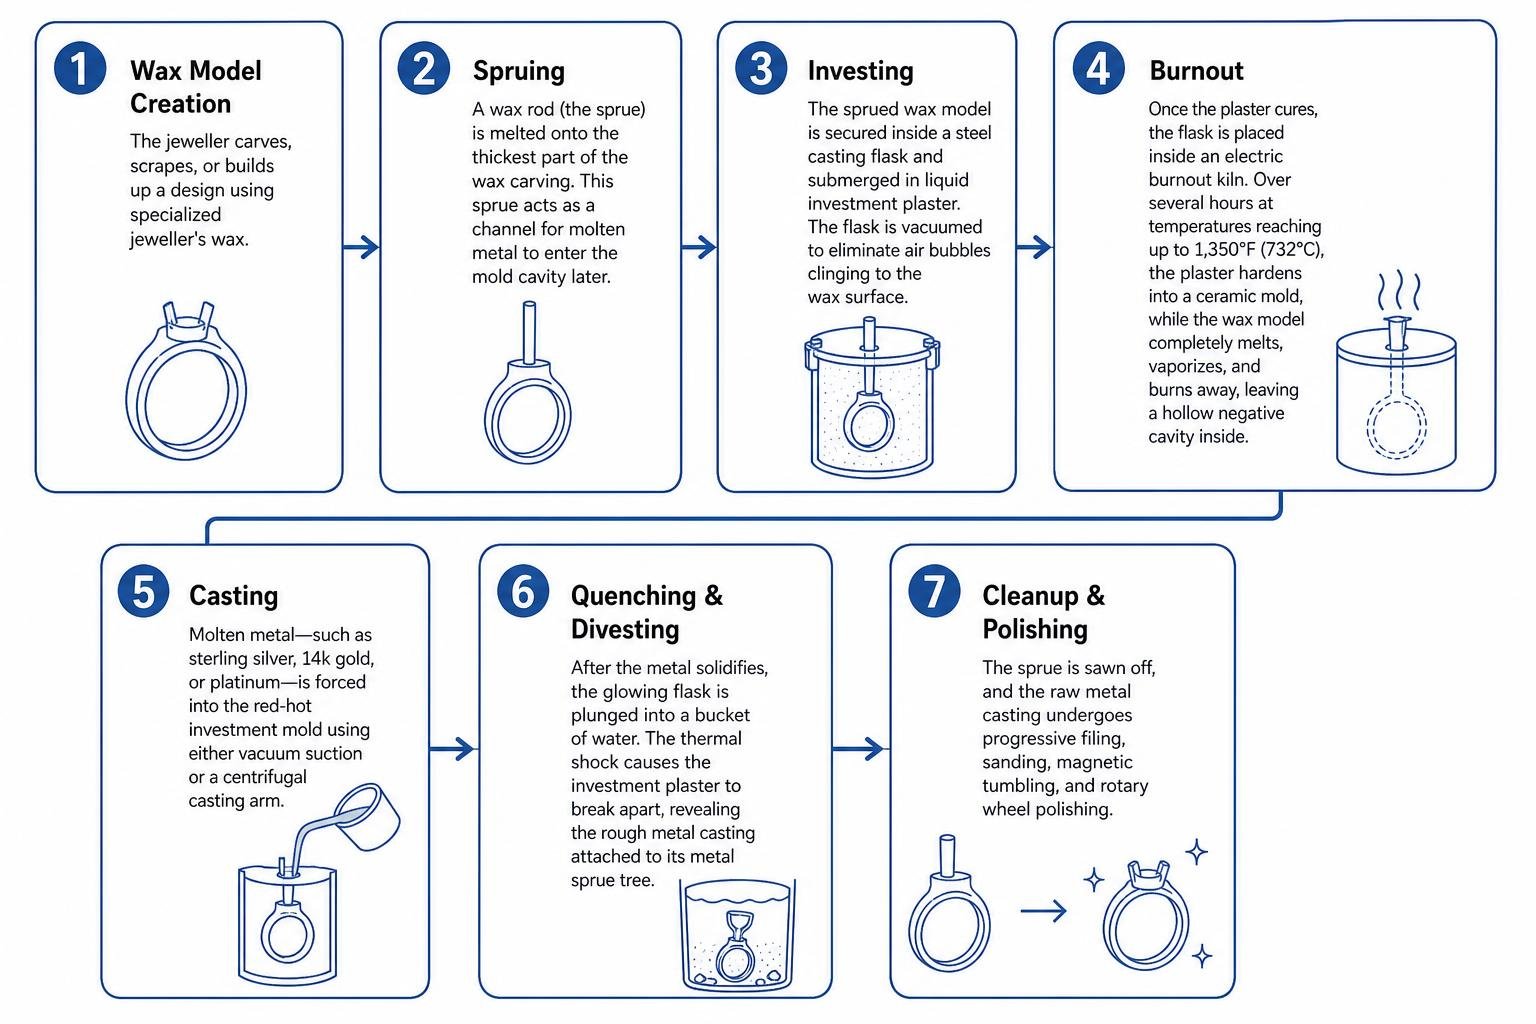
The lost-wax casting sequence transforms a delicate wax sculpture into solid precious metal through a series of thermal and mechanical stages:
- Wax Model Creation: The jeweller carves, scrapes, or builds up a design using specialized jeweller's wax.
- Spruing: A wax rod (the sprue) is melted onto the thickest part of the wax carving. This sprue acts as a channel for molten metal to enter the mold cavity later.
- Investing: The sprued wax model is secured inside a steel casting flask and submerged in liquid investment plaster, a specialized heat-resistant plaster compound. The flask is vacuumed to eliminate air bubbles clinging to the wax surface.
- Burnout: Once the plaster cures, the flask is placed inside an electric burnout kiln. Over several hours at temperatures reaching up to 1,350°F (732°C), the plaster hardens into a rigid ceramic mold, while the wax model completely melts, vaporizes, and burns away, leaving a hollow negative cavity inside.
- Casting: Molten metal—such as sterling silver, 14k gold, or platinum—is forced into the red-hot investment mold using either vacuum suction or a centrifugal casting arm.
- Quenching & Divesting: After the metal solidifies, the glowing flask is plunged into a bucket of water. The thermal shock causes the investment plaster to break apart, revealing the rough metal casting attached to its metal sprue tree.
- Cleanup & Polishing: The sprue is sawn off, and the raw metal casting undergoes progressive filing, sanding, magnetic tumbling, and rotary wheel polishing.
Choosing the Right Wax for Custom Wax Carving Jewellery
Jeweller’s carving waxes are synthetic hydrocarbon formulations engineered specifically for machining, filing, and clean burnout. Unlike household candle wax or soft modeling clay, carving wax holds sharp edges, can be drilled and sawn without clogging fine teeth, and will not crumble under tool pressure.
The industry standard is Ferris File-a-Wax, categorized by distinct color-coded hardness levels:
- Green Wax (Hardest): Extremely rigid and dense. It has virtually no flex and melts at approximately 230°F (110°C). Green wax is the premier choice for intricate geometric patterns, delicate prong work, crisp bezels, sharp lines, and fine filigree engraving. Because it is brittle, dropping a thin green wax model onto a hard floor can shatter it.
- Purple Wax (Medium-Hard): A balanced blend offering moderate rigidity with slight flexibility. Purple wax files cleanly like green wax but allows for slightly more give when carving slimmer ring shanks or sculptural contours. It is widely regarded as the best all-around wax for beginners.
- Blue Wax (Flexible / Softer): Blue carving wax is significantly softer and more pliable than green or purple wax. It carves quickly with hand tools and can withstand gentle bending without snapping, making it ideal for thick, organic, and rounded forms where ultra-crisp edges are not required.
-
Specialty Waxes:
- Sheet Wax: Uniform sheets rolled in standard metal gauge thicknesses (such as 18, 20, or 22 gauge), ideal for fabricating backing plates, bezel walls, and textured pendants.
- Wax Wire & Profile Rods: Extruded round, half-round, and square wax wires used for building ring shanks, decorative wirework, and sprue channels.
- Pre-Formed Ring Tubes: Solid wax cylinders with off-center, centered, or flat-top profiles designed specifically for ring making.
| Wax Type | Hardness Level | Flexibility | Best Design Applications |
|---|---|---|---|
| Green File-a-Wax | Very High | Very Low (Brittle) | Sharp lines, signet crests, detailed engraving, fine bezels |
| Purple File-a-Wax | Medium-High | Moderate | Balanced general carving, signet rings, beginner projects |
| Blue File-a-Wax | Medium | High | Organic forms, sweeping curves, beginner practice pieces |
| Sheet & Wire Wax | Variable | Very High | Fabricated layers, organic drapery, sprue feeds, uniform bands |
Essential Tools and Studio Setup for Beginners
One of the greatest advantages of custom wax carving jewellery is its minimal footprint. Unlike traditional metalsmithing, which requires heavy anvils, rolling mills, pickle pots, and high-temperature torches, wax carving can be done at a compact desk with a modest investment in hand tools.
Basic Bench Tools and Heat Shaping Equipment
To establish an efficient, ergonomic wax carving station, equip your bench with these primary hand tools:
- Jeweller’s Saw Frame & Spiral Saw Blades: A standard 3-inch or 4-inch deep saw frame fitted with coarse spiral wax blades (sizes #1 to #3). Unlike flat metal blades, spiral blades cut cleanly in all directions without binding in the wax.
- Bench Pin & Clamp: A hardwood bench pin clamped securely to your tabletop provides essential support for sawing, filing, and scraping. Keep a dedicated bench pin exclusively for wax work to prevent residual metal filings from contaminating your clean wax shavings.
- Coarse Wax Files & Needle Files: Double-ended coarse wax files feature widely spaced, aggressive teeth that remove bulk wax rapidly without clogging. For refining contours and interior curves, assemble a set of fine swiss-pattern needle files (round, half-round, triangle, and flat profiles).
- Wax Ring Tube Sizer: A handheld, tapered steel mandrel equipped with an integrated cutting blade. Rotating the tool inside a hollow wax ring tube shaves off uniform, paper-thin wax ribbons to enlarge the inner finger size accurately.
- Precision Measuring Calipers: Digital or dial calipers are vital for checking wall thicknesses across your model. Maintaining consistent wall dimensions prevents weak structural zones and casting porosity.
- Wax Carvers & Dental Tools: Stainless steel dental scrapers, spatulas, and spoon carvers allow you to hollow out rings, scoop excess interior mass, scrape organic textures, and refine hard-to-reach undercuts.
- Alcohol Spirit Lamp or Electric Wax Pen: A simple glass alcohol burner fueled by denatured alcohol provides a clean, soot-free flame for warming carving blades. For maximum control, a variable-temperature electric wax pen enables you to melt, drop, weld, and sculpt liquid wax with surgical precision.
- Wolf Relief Wax / Sticky Wax: Low-melting specialty waxes used to weld multiple wax components together, repair accidental file slips, or build raised organic spheres and decorative beads.
When embarking on fine jewellery commissions, partnering with an experienced bespoke engagement ring maker helps bridge the gap between creative wax sculpting and heirloom-quality structural integrity.
DIY At-Home Kits vs. In-Person Workshops
Aspiring makers can choose between curated at-home carving kits or hands-on studio workshops.
At-Home Carving Kits: Turnkey kits (such as those from Carve & Cast, priced around $250) provide precut wax ring blanks or pendant templates, basic carving scrapers, sizing guides, thumb guards, and prepaid mailers. These kits allow you to carve comfortably at your own pace at home. Once your wax prototype is complete, you post the model back to their casting facility, where technicians invest, cast, tumble, polish, and return your completed sterling silver or bronze piece directly to your door.
In-Person Studio Workshops: Structured studio courses offer access to professional extraction hoods, burnout kilns, flex-shaft rotary machines, and live instructor guidance.
For example, specialized fine jewellery making workshops in Brooklyn run comprehensive multi-session programs costing around $600 (excluding wholesale metal costs). In London, studios like Stööki host popular creative workshops at Boxpark Shoreditch starting at £50 per ticket, offering on-demand casting upgrades for sterling silver rings starting around £80 and pendants around £85 (including a standard £5 to £20 casting handling fee).
Furthermore, self-paced digital courses like Domestika's Wax Carving Techniques for Jewelry Design—boasting over 11,800 enrolled students and a 99% positive review rating—provide extensive visual walkthroughs on mastering complex sculptural techniques.
Studio Safety & Etiquette: When attending in-person workshops, studios enforce strict health, safety, and liability waiver policies:
- Always wear closed-toe leather or canvas shoes (never open sandals) to guard against falling heavy tools or hot wax splatters.
- Tie long hair securely back and remove loose jewelry, ties, or dangling scarves.
- Wear impact-resistant safety glasses when sawing, grinding, or operating flex-shaft polishing wheels.
- Adhere strictly to studio age requirements (many workshops require students to be 18 years or older) and maintain complete sobriety around hot tools and casting apparatus.
Mastering Custom Wax Carving Jewellery: From Concept to Model
Successful wax carving demands a thoughtful approach. Unlike carving stone, where material can never be returned once cut, wax is forgiving: you can rebuild subtracted areas by welding fresh wax. However, planning your piece through sketches and precise technical measurements ensures a smooth transition from concept to metal.
Studying the standard custom jewelry fabrication process illustrates how preliminary sketches translate into measurable volumetric models before casting.
Step-by-Step Guide to Custom Wax Carving for Jewellery
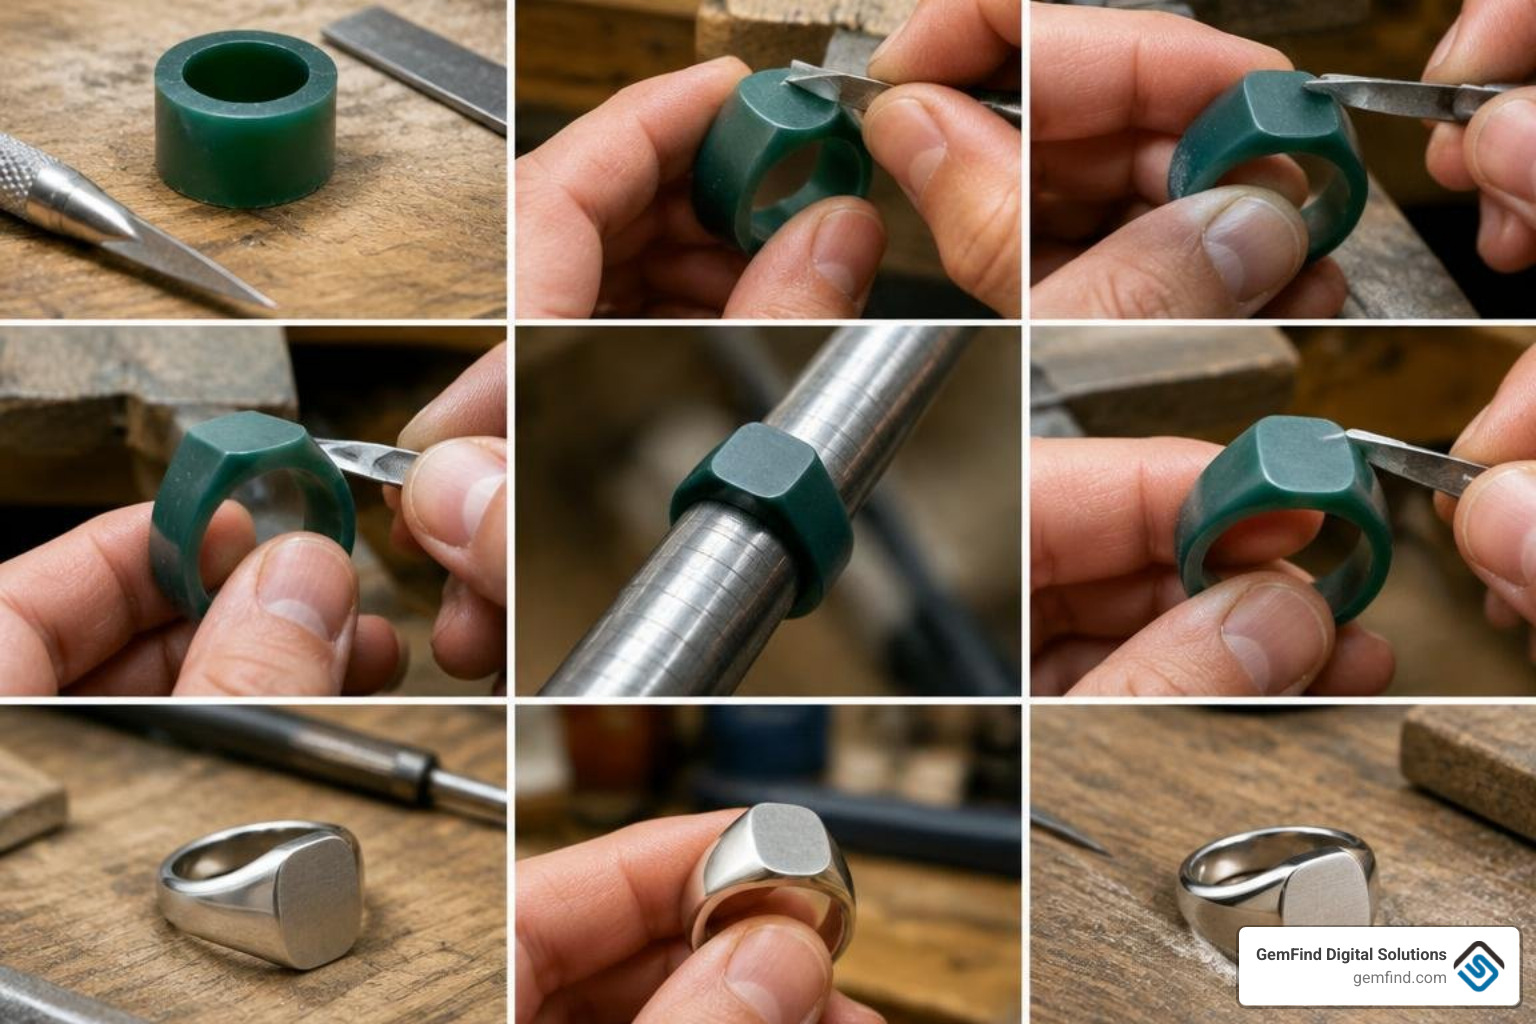
Follow this systematic walkthrough to carve a classic signet or textured band from a raw wax tube:
Step 1: Ideation and Technical Sketching
Draft 1:1 scale drawings of your design showing the top view, side profile, and cross-section. Calculate target dimensions, paying close attention to minimum band thicknesses (ideally no thinner than 1.5 mm to prevent structural warping during polishing and daily wear).
Step 2: Sizing the Finger Diameter
Slide your wax ring tube onto a standard metal ring mandrel to check the starting size. Insert your wax ring tube sizer into the central hole. Turn the sizer clockwise with light, steady pressure. The internal blade will shave away thin wax curls. Check the size frequently on a calibrated ring stick until the hole is one half-size smaller than your final desired target size. This leaves adequate metal thickness for interior emery sanding and buffing after casting.
Step 3: Sawing the Ring Blank
Using digital calipers, measure the overall width required for your ring blank (for example, 8 mm for a wide band). Scribe a clean reference line around the tube using the sharp point of your caliper or a steel divider. Mount a spiral wax saw blade into your saw frame. Rest the tube on your bench pin and saw smoothly along your scribed line, rotating the tube slightly after every few strokes to keep the cut square and flat.
Step 4: Trueing the Blank Faces
Rub the cut sides of your wax blank against a sheet of 240-grit wet/dry sandpaper laid flat on a smooth glass or steel plate. Apply even downward finger pressure in a figure-eight motion until both faces are flat, parallel, and perpendicular to the center bore.
Step 5: Transferring Profiles and Rough Carving
Coat the top and side surfaces of the wax blank with a thin layer of water-soluble white gouache or a dark permanent marker. Scribe your profile outlines into the colored surface using a steel tracing point.
Using a coarse wax hand file, bevel the outer edges and file away excess material down toward your layout lines. Keep your filing strokes long, sweeping, and deliberate. Support the fragile wax directly against the V-slot of your wooden bench pin.
Step 6: Refinement and Symmetry Check
Switch to fine swiss-pattern needle files to sculpt precise contours, tapered shoulders, and bezel borders. Check the symmetry of your piece from multiple angles under bright bench lighting. Hold the wax against a calibrated ruler or compare opposing sides using precision calipers.
Step 7: Hollowing and Weight Reduction
To ensure comfortable daily wear and avoid excessive metal weight costs, use rounded dental scrapers to hollow out the underside of heavy top sections or thick signet faces. Maintain a uniform wall thickness of 1.5 mm to 2.0 mm throughout.
Step 8: Surface Finishing
Scrape the entire surface with a razor-sharp steel scraper or the flat back edge of an exacto blade to eliminate coarse file scratches. Next, lightly sand the piece with progressive grits of wet/dry silicon carbide sandpaper (400, 600, and 1200 grit), using water as a lubricant to prevent friction heat from melting fine surface details.
For a glassy, mirror-like pre-cast shine, gently rub the wax with a scrap of soft denim cloth dipped in mineral spirits, or buff it briskly using a nylon stocking.
For custom jewellers looking to expand their bespoke offerings, learning how to create personalized jewelry with unique wax textures provides a distinct competitive edge. Additionally, integrating interactive tools like a custom diamond ring builder allows clients to visualize stone shapes on personalized mountings before carving begins.
Incorporating Gemstones and Textures: Possibilities and Limitations
Adding gemstones to hand-carved wax requires careful consideration of thermal dynamics and metal shrinkage.
Pre-Carved Gemstone Seats: Beginners should carve stone settings (such as bezel walls, flush-mount recesses, or prong configurations) precisely to stone dimensions in the wax model, leaving an extra 0.2 mm to 0.3 mm clearance. This accounts for the 1.5% to 2.5% volumetric shrinkage that occurs as molten metal cools and solidifies.
Cast-in-Place Gemstones vs. Post-Cast Setting: In standard lost-wax manufacturing, precious stones are set by hand after the raw metal casting has been cleaned and trued.
While advanced production techniques allow certain heat-resistant gemstones (such as natural diamonds, corundum sapphires, and synthetic cubic zirconias) to be embedded directly into wax and cast in place, this process carries substantial risks. Heat-sensitive or included gems—such as emeralds, opals, tanzanite, pearls, and turquoise—will crack, burn, or shatter inside a high-temperature casting kiln. Beginners should always plan for traditional post-cast stone setting by a skilled setter.
Sculptural & Organic Texturing: Wax excels at holding tactile surface textures that are difficult to forge directly in metal:
- Flame-Treated Textures: Rapidly passing a small torch flame across wax creates molten ripples and rounded, fluid edges.
- Heated Tool Impressions: Pressing heated needle tips, serrated screw threads, wire meshes, or coarse burlap into cool wax yields striking organic motifs.
- Mitsuro Hikime: This traditional Japanese wax technique blends pine resin and beeswax. When gently warmed in warm water and stretched like taffy, it develops striated, pleated linear ribbons that freeze into sculptural waves, perfect for flowing, oceanic ring bands and statement pendants.
From Wax to Wearable: Metal Conversion, Casting, and Cost Calculation
Once your wax master model is refined, it is ready for professional casting. You can send your piece to a specialist precious metal casting house or contract casting studio.
When submitting models, ensure a sprue is correctly attached. The sprue must join the heaviest section of the carving at an angle that encourages smooth, unobstructed metal flow, preventing turbulence and shrinkage porosity during casting.
If you plan to produce a limited collection, the caster can build a vulcanized rubber or room-temperature-vulcanizing (RTV) silicone mold from your raw metal master, allowing dozens of identical wax duplicates to be injected and cast efficiently.
When designing matching bespoke bridal sets or custom his and hers rings, mastering these mold-making and casting workflows ensures consistent proportions across the collection.
Calculating Metal Weight and Material Costs
Because jeweller’s wax is featherlight compared to dense precious metals, you must calculate metal conversion weights to accurately quote metal costs.
Wax is approximately 10 times lighter than sterling silver and 16 times lighter than 18-carat yellow gold.
To determine the final metal weight, weigh your completed wax model (including the sprue base if casting yourself) on a high-precision digital scale accurate to 0.01 grams, then multiply the wax weight by the specific gravity multiplier of your target metal alloy:
- Sterling Silver (.925): Wax Weight × 10.4
- 14k Yellow Gold: Wax Weight × 13.0
- 14k White Gold: Wax Weight × 13.6
- 18k Yellow Gold: Wax Weight × 15.5
- 18k White Gold: Wax Weight × 16.0
- Platinum (950 Plat): Wax Weight × 21.5
For example, a solid signet ring carving weighing 1.20 grams in wax will weigh approximately 12.48 grams in sterling silver (1.20 × 10.4) or 18.60 grams in 18k yellow gold (1.20 × 15.5). Factoring in dynamic wholesale metal markets and a base casting flask fee (typically $20 to $45 per tree), calculating accurate wax weights keeps your custom projects profitable and within client budgets.
Casting, Finishing, and Authentication
When your piece emerges from the casting flask, it looks chalky and raw. Transforming this rough casting into a finished jewel involves several finishing stages:
- Sprue Removal: Saw the solid metal sprue stub off as close to the ring shank as possible using a jeweller’s hand saw lubricated with beeswax or cutting lube. Grind the remaining stub flush using coarse carbide burs or a flat hand file.
- De-oxidation and Magnetic Finishing: Pickle the piece in a warm sodium bisulfate acid solution to strip heat firescale and investment residues. Placing the metal into a magnetic pin tumbler for 30 minutes burnishes hard-to-reach recesses and compacts surface crystal structures.
- Progressive Emery Sanding: Remove surface irregularities using emery sticks wrapped with silicon carbide abrasive papers, advancing smoothly from 320 grit up to 1000 grit.
- Rotary Buffing & Final Polish: Using a high-speed polishing lathe or flex-shaft handpiece, apply Tripoli polishing compound on a stiff stitched muslin buff to remove microscopic sanding lines. Wash the piece thoroughly in an ultrasonic bath, then apply dialux rouge or green chrome compound on a soft flannel buff to produce a deep, mirror-like lustre.
- Assay Office Hallmarking: In countries with strict precious metal regulations (such as the UK, governed by the London Assay Office), the piece undergoes metallurgical assay testing. It is struck with official hallmarks identifying the sponsor maker's mark, the metal fineness standard, the assay office symbol, and the production year stamp, certifying its authenticity for the client.
Frequently Asked Questions About Custom Wax Carving
Which wax color is best for absolute beginners?
Purple File-a-Wax is widely considered the best choice for beginners. It balances the rigidity and crisp edge retention of green wax with the workable flexibility of blue wax. It files smoothly without clogging fine teeth and is less prone to accidental fracturing when dropped or clamped at the bench.
How do I calculate the final metal weight from my wax carving?
Weigh your finished wax model on a 0.01-gram digital pocket scale. Multiply that wax weight by the specific conversion multiplier of your selected metal alloy: multiply by 10.4 for sterling silver, 13.0 for 14k gold, 15.5 for 18k gold, or 21.5 for platinum. Always add 10% to 15% to your metal budget to cover the sprue button, casting allowances, and finishing losses.
Can beginners set stones directly into carved wax?
While casting stones in place is technically possible with select heat-tolerant gems like diamonds and laboratory-grown sapphires, beginners should avoid it. Natural thermal shock, molten metal turbulence, and flux chemistry frequently crack, cloud, or displace embedded stones during kiln burnout. The safest and most professional method is to carve accurate seats, bezels, or prongs in wax, then hand-set the gemstones into the clean metal casting after all casting and tumbling steps are complete.
Conclusion
Custom wax carving represents the perfect union of ancient artisanal craft and contemporary personal expression. By sculpting malleable wax with files, scrapers, and controlled heat, you hold complete creative authority over every contour, curve, and texture of your jewellery. Translating those tactile wax models into shining, durable silver, gold, and platinum heirlooms keeps the rich legacy of lost-wax casting thriving.
For modern jewellery designers, master bench artists, and retail businesses, handcrafting custom pieces is only half the journey—effectively marketing and showcasing bespoke services to eager clients is equally crucial.
At GemFind Digital Solutions, we specialize in empowering fine jewellery brands through bespoke digital marketing, tailored web design, and seamless inventory technology. With over 25 years of industry-specific expertise, being an official Shopify and Google Partner, and offering deep Edge POS integrations alongside dynamic retail applications, we help jewellery artisans grow their custom design businesses. Explore our custom jewelry websites complete guide to learn how to present your bespoke collections online and attract high-value custom commissions.


