


Why Jewelry Is the Most Challenging Product to Photograph
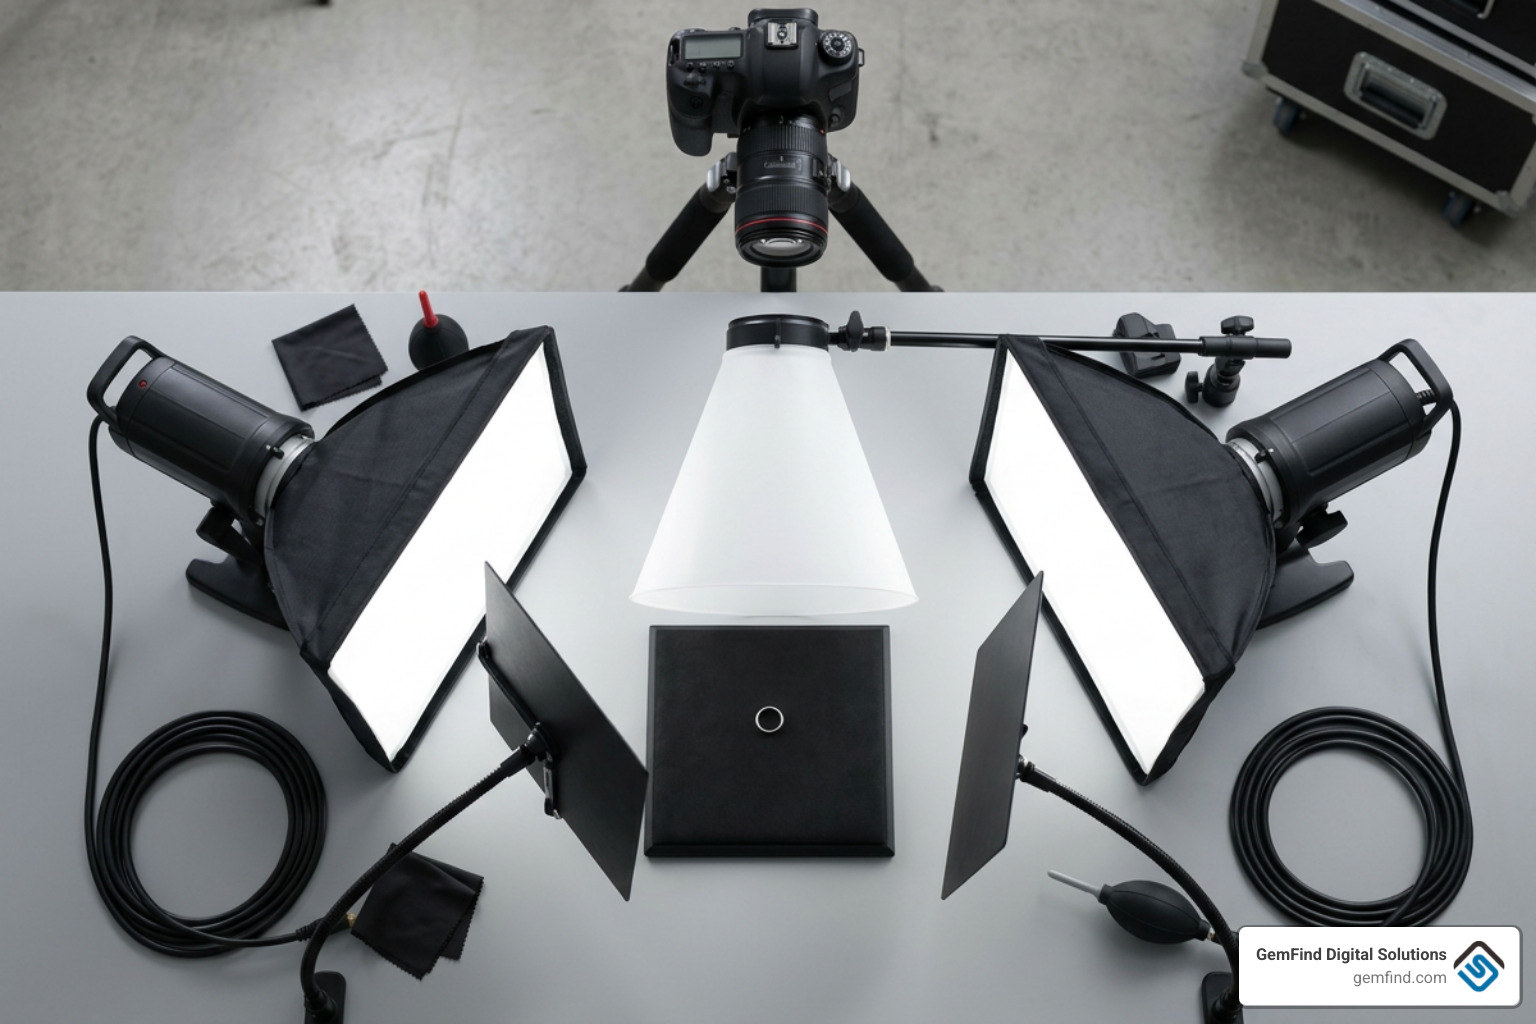
To master jewelry product photography, mount a camera equipped with a 1:1 macro lens on a heavy-duty tripod, combine soft diffused lighting for metals with a hard pinpoint light for gemstone fire, shoot focus-bracketed exposures at f/8 to f/11, capture four core angles (hero packshot, 45-degree angle, macro detail, and on-model scale), and clean dust and reflections in post-production.
Jewelry remains the single most demanding category in commercial e-commerce photography. When shooting apparel or home goods, fabrics absorb light and forgive minor lighting imperfections. Polished gold, platinum, and silver, however, act as literal mirrors. When you point a camera at a polished ring, you are not photographing the metal itself—you are photographing everything in the room that reflects off its surface, including your light stands, ceiling tiles, and your own reflection.
Beyond surface specularity, jewelry presents three distinct physics problems:
- Extreme Magnification and Depth of Field: Because fine jewelry is small, capturing intricate details requires high-magnification macro capture. At macro distances, your depth of field collapses to mere millimeters. Even stopping down your aperture cannot bring an entire multi-tiered ring into crisp focus from front to back in a single frame.
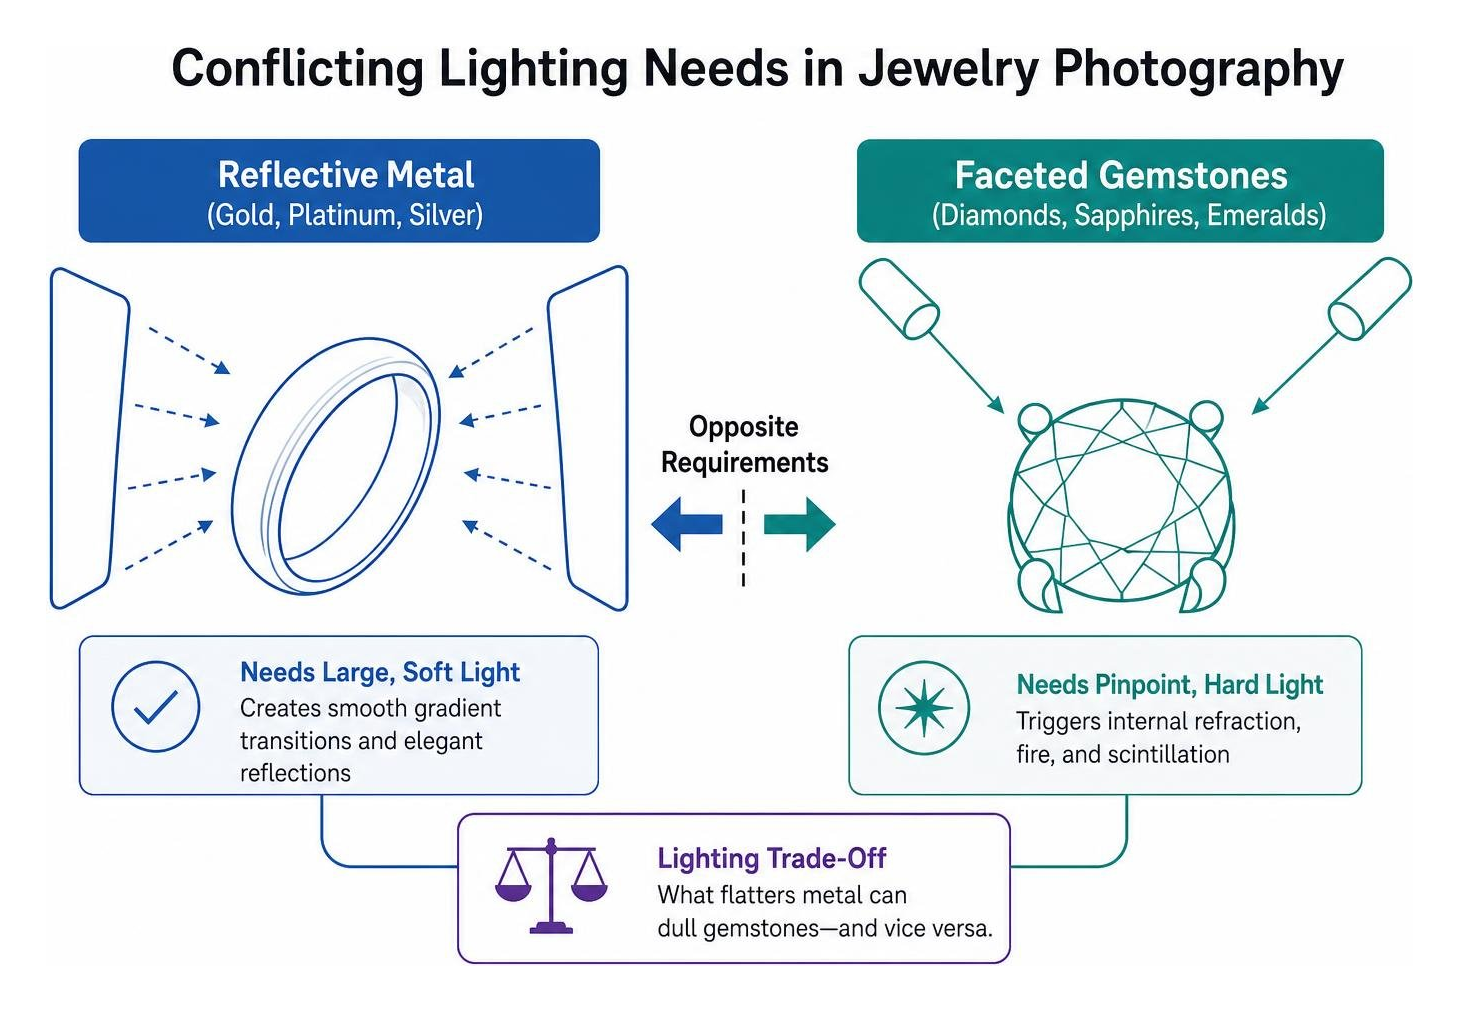
- Opposing Lighting Requirements: Highly polished precious metals require large, ultra-soft diffusion sources to create smooth, elegant gradient transitions across curved bands. Conversely, faceted gemstones like diamonds, sapphires, and emeralds become dull and lifeless under pure diffusion; they demand pinpoint, hard light sources to trigger internal refraction, fire, and scintillation.
- Color Temperature and Fidelity: Precious metals quickly pick up surrounding ambient color casts. A slight warm bounce can make white gold look yellow, while an unbalanced cool reflection turns yellow gold greenish. Mixed lighting temperatures destroy material authenticity and mislead buyers.
When online imagery fails to communicate precise proportions, setting heights, and metal tones, return rates climb. Learning how to take control of your jewelry photography is the most reliable way to eliminate buyer hesitation and protect your margins.
The 5-Step Guide to Professional Jewelry Product Photography
Building an efficient, repeatable studio workflow allows you to maintain catalog consistency across hundreds of SKUs without rebuilding your lighting for every piece. Follow this step-by-step framework to produce crisp, high-converting commercial imagery.
Step 1: Assemble Essential Gear for Jewelry Product Photography
Achieving commercial sharpness requires a specialized foundation. While modern smartphones capture acceptable casual content, dedicated camera bodies paired with optical macro lenses remain the standard for high-end digital catalogs.
- Camera Body (DSLR or Mirrorless): Use a body that supports manual exposure mode, tethered capture, and manual focus peaking. Full-frame or APS-C sensors give you the dynamic range necessary to capture specular highlights without blowing out metal details.
- True 1:1 Macro Lens: Standard zoom lenses cannot resolve fine hallmark stamps or micro-pavé settings. Invest in a dedicated macro lens with a focal length between 90mm and 105mm (such as a 100mm f/2.8 macro). This focal length provides comfortable working distance between the front lens element and your lighting modifiers. If you are operating on a strict budget, mechanical extension tubes paired with a prime lens offer an affordable entry point.
- Heavy-Duty Tripod and Geared Head: Camera shake ruins macro sharpness. Choose a solid, weighted tripod. A three-way geared head is preferable to a ball head because it allows micro-adjustments along the X, Y, and Z axes without slipping.
- Staging Tools and Cleaners: Keep museum putty and non-staining dental wax on hand to stand rings and earrings upright invisibly. Use lint-free microfiber gloves, anti-static dust brushes, and optical cleaning wipes. Cleaning your jewelry thoroughly before shooting saves countless hours of manual post-production retouching.
Step 2: Build a Dual-Source Lighting Setup and Control Reflections
Because smooth metals need broad diffusion while gemstones need hard directional light, successful setups combine both.
- Soft Continuous LEDs or Strobes with Acrylic Diffusion: Place large diffused light sources close to the piece. Using translucent white acrylic sheets or a specialized conical diffusion modifier (such as a Light Cone) wraps reflective curved metals in clean, even highlights. Bringing a bare light source close to an acrylic sheet creates a smooth gradient across the metal band rather than a harsh, blown-out specular hotspot.
- Gemstone Sparkle Light (Snoot or Picolite): Introduce a secondary, low-power directional light source directed straight into the stone facets. A focused snoot or picolite projection attachment generates the crisp specular points required to showcase diamond fire without washing out the metal settings.
- Controlling Reflections with Flags and Lens Boards: To block the camera and room from reflecting on the piece, cut a small aperture hole into a white or black foam board and position it directly in front of the lens. Place thin black cards (flags) just outside the camera frame on either side of the product. These black cards introduce dark, contrasting edge reflections that define the physical silhouette of reflective white gold and silver pieces against white sweeps.
Step 3: Configure Camera Settings and Focus Stacking for Macro Detail

To capture every prong, facet, and engraving in razor-sharp focus, adjust your technical camera settings to avoid physical optical limitations:
- Base ISO (100–200): Keep your ISO at its native base setting to eliminate digital noise in dark gemstone pockets and shadows.
- Aperture Sweet Spot (f/8 to f/11): While stopping down to f/22 might seem like an easy way to gain depth of field, it introduces optical diffraction, making the overall image soft. Keep your aperture between f/8 and f/11 for maximum optical resolving power.
- Tethered Capture & Shutter Delay: Connect your camera directly to a monitor or laptop via a tether cable. Trigger the shutter via software or a 2-second timer delay to eliminate mechanical vibrations from pressing the shutter button.
-
Focus Stacking (Focus Bracketing): Because f/11 cannot cover the entire depth of a ring at 1:1 magnification, shoot a focus bracket sequence. Keep the camera locked on your tripod and take 8 to 20 images, shifting the focus plane slightly from the front edge of the shank to the back of the setting. Merge these frames inside Adobe Photoshop (
File > Scripts > Load Files into Stack, followed byAuto-Align LayersandAuto-Blend Layers > Stack Images) or dedicated software like Helicon Focus to output a single image that is tack-sharp from front to back.
Step 4: Capture the Four Essential E-Commerce Angles
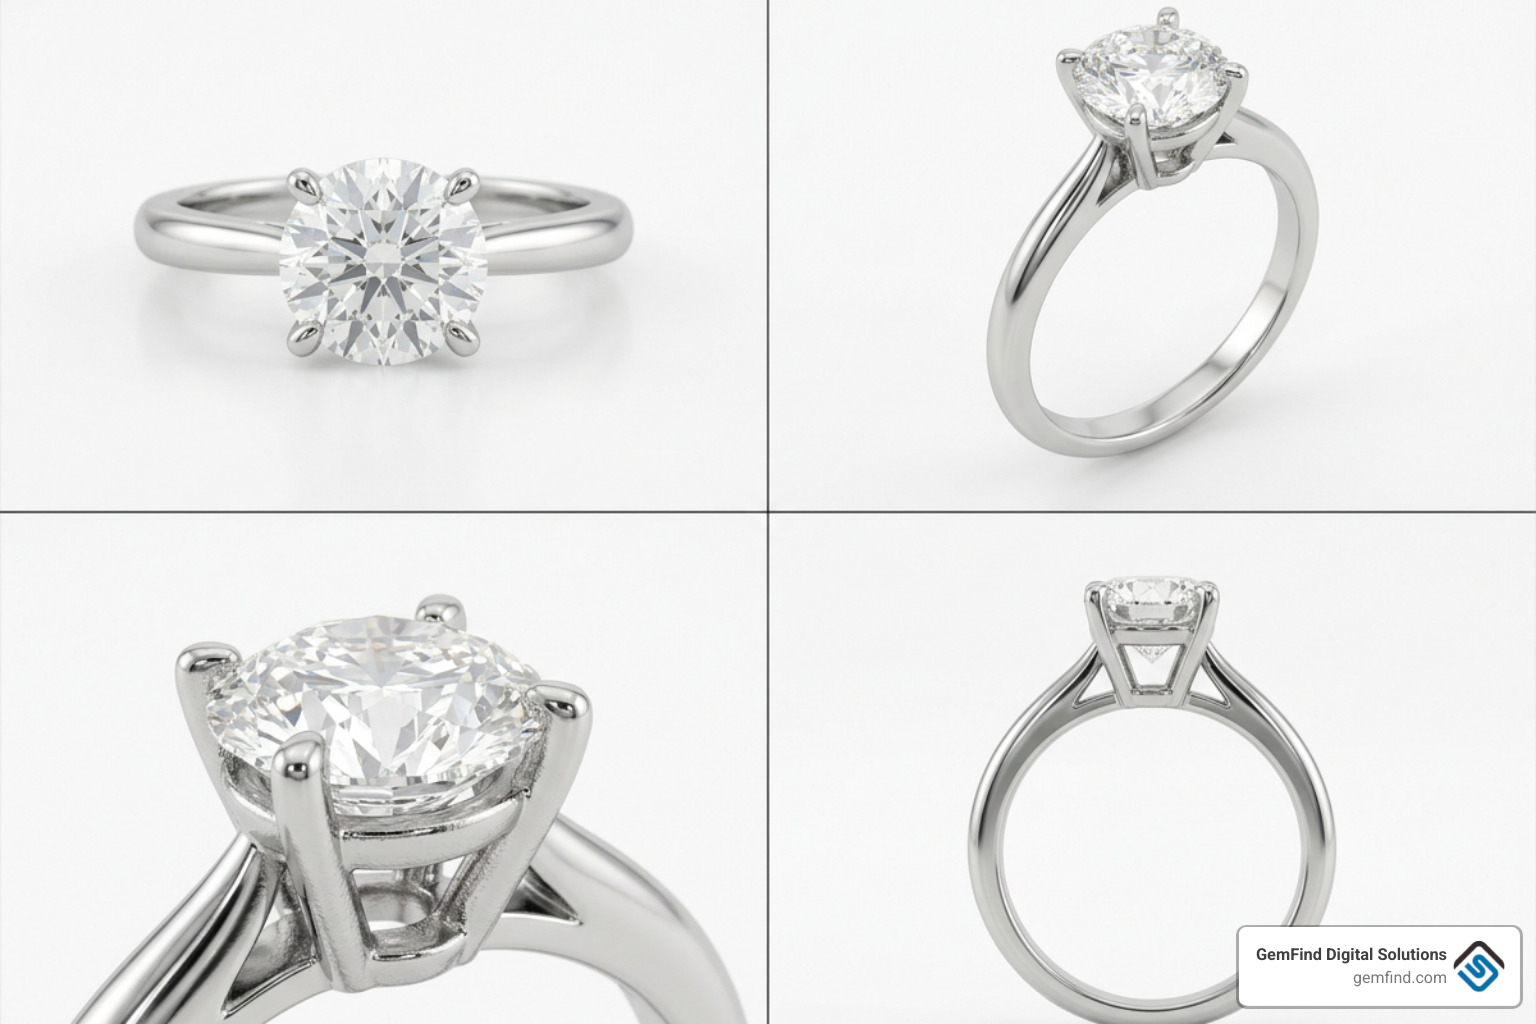
Online shoppers cannot pick up, touch, or try on your pieces. Providing a comprehensive, predictable multi-angle layout builds visual confidence and drives conversions. As we explore in our guide on enhancing your jewelry stores website with quality photography, every high-performing product listing requires four foundational shots:
- The Hero Packshot: A clean, straight-on or elevated 30-degree perspective on a seamless, distraction-free pure white or light gray sweep. This is your primary catalog image.
- The 45-Degree Perspective: Shows dimensional depth, revealing gallery wirework, setting height, and side-stone arrangements. For rings, this view tells the buyer how high the centerpiece sits off the finger.
- The Macro Detail Shot: An extreme close-up showing hallmark stamps, prong work, pavé alignment, or gemstone inclusions. This serves as visual proof of craftsmanship and justifies premium price points.
- The Scale Reference & Worn Model Shot: A human model shot (or flat-lay scale reference) demonstrating placement on an earlobe, collarbone, or hand. Showing how a pendant rests against skin instantly clarifies size and drape.
When styling editorial or social media flat lays, complement your metals with textured, non-distracting materials such as slate slabs, raw linen, or matte acrylic tiles that absorb stray light while elevating perceived value.
Step 5: Master Retouching and AI Jewelry Product Photography Workflows
Even in a clean studio environment, macro magnification reveals microscopic dust specks, light handling marks, and micro-scratches invisible to the naked eye. Post-production refines these captures into commercial assets:
- Precision Cleanup: Use healing brushes and clone stamps to remove dust specks and skin oil smears from metal bands without softening sharp metal edges or facet junctions.
- Stone-by-Stone Color Balancing: Fine-tune the color and contrast of center gemstones independently from surrounding metal bands. This ensures emeralds retain their vivid saturation without turning yellow gold settings brassy.
- Integrating AI Workflows Responsibly: AI image editing tools have unlocked substantial cost efficiencies. For brands managing large catalogs, pairing basic captures with AI-assisted enhancement tools can save $50 to $150 per image compared to traditional multi-phase studio outsourcing, with some brands recording a +140% increase in conversion after upgrading outdated imagery.
-
AI Guardrails and Limits: Use AI tools primarily for generating creative backgrounds, lifestyle scenes, or cleaning backgrounds using exact hex-code matching (e.g.,
#FFFFFF). Never use generative AI to alter stone cut patterns, facet counts, carat proportions, or metal hallmarks. Doing so distorts product reality, alienates buyers, and violates e-commerce consumer protection standards. For high-value signature collections, relying on dedicated jewelry photography services guarantees hand-retouched optical authenticity across every SKU.
Marketplace Specifications, Sizing Rules, and FTC Compliance
Selling jewelry online across multiple channels requires balancing marketplace platform requirements with strict federal advertising guidelines:
- Amazon Standards: Amazon requires main hero images to feature a pure white background (RGB 255, 255, 255) with the product filling at least 85% of the frame. File dimensions should exceed 1,000 pixels along the longest edge to activate the interactive zoom engine (ideally 2,000 to 3,000 pixels).
- Etsy and Direct-to-Consumer: While Etsy permits styled lifestyle and editorial main images, thumbnails crop to a 1:1 square ratio in search results. Ensure the piece is centered so essential elements are not clipped.
- FTC Jewelry Guides (16 CFR Part 23): Under the FTC Jewelry Guides (specifically Note 3 to §23.1), displaying a gemstone or piece of jewelry significantly larger than its actual physical size without clear size disclosure can be deemed deceptive. Because Amazon's 85% frame-fill rule forces a 4mm stud earring to fill an entire desktop screen, you must accompany macro imagery with explicit millimeter dimensions, carat weights, and on-model scale photos.
Review our detailed tips for taking the best photos of jewelry for your website to ensure your image assets balance algorithmic marketplace compliance with visual appeal.
Budgeting: DIY Studio vs. AI Tools vs. Professional Photographers
Choosing the right production model depends on your inventory volume, average order value (AOV), and internal production capacity:
| Production Method | Initial Hardware Setup Cost | Cost Per Usable Finished Image | Turnaround Time | Best Suited For |
|---|---|---|---|---|
| DIY In-House Studio | $1,500 – $4,500 (Camera, Macro Lens, Geared Head, Lights) | $5 – $15 (Labor time & internal editing) | 24 – 48 Hours | Fast turnaround, daily inventory restocks, independent designers |
| AI-Assisted Hybrid System | $300 – $1,000 (Smartphone/Entry Light Box + AI Subscriptions) | $2 – $10 (Software subscription costs) | Under 5 Minutes per SKU | High-volume fashion jewelry, social media variations, seasonal background updates |
| Commercial Studio Outsourcing | $0 (No hardware overhead) | $50 – $150+ per finished master image | 1 – 3 Weeks | High-end fine jewelry, bridal lines, hero website banners, signature lookbooks |
Investing in high-end commercial imagery pays measurable dividends. As we break down in our analysis on why your website needs a professional photographer, professional imagery elevates brand perception, improves digital marketing conversion rates, and reduces customer returns.
Frequently Asked Questions About Jewelry Photography
How do you photograph shiny jewelry without unwanted reflections?
Surround the piece entirely using a white translucent diffusion tent or light cone. Cut a small hole in a white foam core board just wide enough for your camera lens to shoot through, blocking reflections of your body, tripod, and studio room. Wear neutral, dark clothing during shoots to avoid reflecting bright colors into polished gold or silver bands.
What is the most effective way to show jewelry scale online?
The most reliable method is pairing high-magnification macro packshots with an on-model photograph. Showing a necklace sitting along a collarbone, a ring worn on a hand, or a stud earring placed on an earlobe gives shoppers instant visual proportion cues. Supplement these images with dimension graphics showing exact millimeter measurements.
When should a brand hire a professional versus using DIY or AI?
DIY and AI-assisted workflows work well for everyday inventory drops, silver fashion lines, and rapid social media creative testing. However, signature bridal lines, high-carat diamond pieces, and complex pavé gemstone arrangements warrant professional commercial photographers with specialized macro equipment, focus-stacking precision, and high-security handling protocols.
Conclusion
Mastering jewelry product photography requires balancing optical precision with creative lighting. By assembling the right macro gear, building a dual-source lighting setup, focus-stacking your captures, and adhering to the four-shot visual framework, you create a digital shopping experience that bridges the gap between an online listing and an in-person jewelry counter.
Whether you are launching a new e-commerce storefront or optimizing your digital marketing catalog, exploring expert jewelry product photography tips will help you elevate your brand and drive consistent e-commerce growth.


